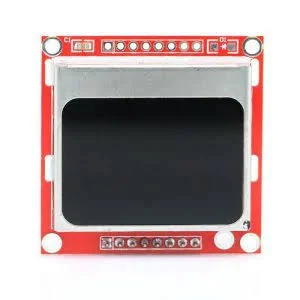
Nokia 5110 LCD Display Module – Red
Description
The name of this product itself is enough to explain its origin. Yes of course !!! this Nokia 5110 LCD Display Module – Red was used in old Nokia 5110/3310 cell phones. Now its been widely used by hobbyists for graphics, text etc.
Though it’s an industrial module, this LCD display is extremely easy to use. The Nokia 5110 is a basic graphic LCD screen for lots of applications. It was originally intended for as a cell phone screen.
This Nokia 5110 LCD Display Module is mounted on an easy to solder PCB. The Nokia 5110 LCD Module uses a Philips PCD8544 LCD driver, which is designed for mobile phones.
Nokia 5110 LCD Display Module is a low-cost monochrome LCD module comprised of 84 X 48 pixels that can be used to display rich graphics and text content. This module is a revision that accepts 5V input. So no extra level shifter is needed.
It uses the PCD8544 controller, which is the same used in the Nokia 3310 LCD. The PCD8544 is a low power CMOS LCD controller/driver, designed to drive a graphic display of 48 rows and 84 columns. All necessary functions for the display are provided in a single chip, including on-chip generation of LCD supply and bias voltages, resulting in a minimum of external components and low power consumption. The PCD8544 interfaces to microcontrollers through a serial bus interface.
Pin Configuration :
- (Reset) RST—-> D3
- (Chip Selection) CE—->D4
- (Data/Commands Choice) DC—->D5
- (Serial Data Line)Din—->D6
- (Serial Clock Speed.)CLK—->D7
- (Backlight Control Terminal) BL—->Gnd
- Vcc—-> 5v to 7V
- Gnd—>Gnd
| Pin No: | Pin Name: | Description |
| 1 | Reset | This pin resets the module. It an active low pin (resets when 0V is provided) |
| 2 | Chip Enable (CE) | This pin is made low (0V) to select this particular display when more than one SPI peripherals are used. |
| 3 | Data/Command (DC) | This pin is used to switch between Data mode (high) and Command mode (low) |
| 4 | Serial Input (DIN) | This is the input pin (MOSI) through which serial instructions are sent |
| 5 | Clock (CLK) | All SPI modules require a common clock, this clock source is supplied to this pin |
| 6 | Power (Vcc) | This pin is used to power the display the supply voltage is from 5V to 7V |
| 7 | Back Light (BL) | Connects to the ground of the circuit. |
| 8 | Ground (Gnd) | Connects to the ground of the circuit. |
Operation of Nokia 5110 LCD Display Module at 3.3V
Many devices that can be used with an Arduino, require a power supply of 3.3V. This is also the case with the Nokia 5110. The best way to deal with 5V devices is to take an Arduino Pro, which can run on 5V.
Thanks to the internal clamp of the PCD8544 we can use a very simple level shifter. Four current limiting resistors of 10kΩ can do the job. When an LCD control line is high, the current through the 10kΩ resistor is just 40uA, so this is harmless. Note that we can’t read back from the LCD with this circuit.
Operation of Nokia 5110 LCD Display Module at 5V
Because VDD max = 7V, the PCD8544 controller can handle 5 to 7V, but the Nokia 5110 LCD works best at 5V. The four resistors of 10kΩ avoid streaks on the LCD display. (at 7V the screen becomes somewhat black when tested)
To have full control, you just need 5 pins. And as a classic display module among open source communities, Robu.in is giving you the handful related tutorials available over the Internet. So there is no need to panic even if you just got your foot in the door.
Features :
- 84 X 48 dot matrix LCD, can show 4 lines of characters.
- Use serial interface communicate with the master processor, the number of interface signal line reduced greatly, only 8 signal lines including power and GND.
- Support different types of MCU, such as the Arduino, AVR, SPI, MCS51 and so on.
- Transfer rate up to 4Mbps, can full speed write display data without waiting time.
- Can use the conductive glue to connect the module to the printed board, without cables. The metal hooks on the module can fix the module on the printed board, which is very easy to install and replace.
- LCD controller/driver chip has been bound to LCD chip, the volume of LCD is small.
- Low power supply, the working current in a normal situation is lower than 200µA and has the power-down mode.
- “LIGHT” linked with GND, the backlight to be lit.
- Need you to compress the screen and PCB tighter, might be got loose after the delivery.
- Use a 5 to 7V controller, otherwise, the display could be quite vague.
Useful link:
https://avdweb.nl/arduino/hardware-interfacing/nokia-5110-lcd
Package Includes :
1 x Nokia 5110 LCD Display.
Tutorial :
How to use Nokia 5110 LCD Module
Related Products
₹511.00 Original price was: ₹511.00.₹463.00Current price is: ₹463.00.
₹288.00 Original price was: ₹288.00.₹222.00Current price is: ₹222.00.
₹799.00 Original price was: ₹799.00.₹705.00Current price is: ₹705.00.
₹139.00 Original price was: ₹139.00.₹86.00Current price is: ₹86.00.


